From this admin page you may start creating your form, add new form pressing on “add new†form or + sign inside the form next to each form title Get start with the black button called “ADD SIMPLE FIELDS†from this toggle option you may choose what kind of field you add in your form. as soon as you click to add any of them you may see a block of the field with 3 labels,


Add a label as a title of the text box
if the textbox is empty fill it with placeholder text
Select to make the field required
Select and visitor will be able to write smth in the text box
Choose to accept texts and numbers or only numbers.

Add a label as a title of the textarea box
if the textbox is empty fill it with placeholder text
Select to make the field required
Select and visitor will be able to write smth in the textarea box
Select to allow size changing with drang function
Set up the height size of the field in pxls

Add a label as a title of the email box
if the textbox is empty fill it with placeholder text
Select to make the field required
Select and visitor will be able to write smth in the email box

Add a label as a title of the selectbox
Add some options, which will toggle down, tick one of the option that will be seen as default
Field is Required.

Add a label as a title of the checkbox
Add some options and tick on one of them as default selected
Select to make the field required
Select and visitor will be able to write smth in the checkbox

Add a label as a title of the tradiobox
Add some options and tick on one of them as default selected
Choose how many columns you want

Add a label as a title of the failbox
Write what kind of formats it will allow to upload
Write a number for maximum uploading file size in Mb
Write path of the folder in computer. Use / (slesh) for separation of folders. example: wordpress/images/icons
Select to make the field required

Add captcha using two kind of keys. you can get the keys following the link provided in popup.
Choose image or audio
choose light or dark theme for the captcha box

Write text on your custom button
Choose what action to do after pressing on the custom button:
Button click with direct to the custom URL
Accept the submission and print a custom text as success message
Accept the submission but only refresh the page
Write text on reset button
Select to show reset button or not.

Select Theme. Choose 5 default themes that we have added for you. Here you will also find those themes, that you have created yourself using premium version After all changes press Save Form
In the same admin page you will find a button called “Get Shortcode†This will give you two types of shortcodes
Where n is the iD of form, add this code in page or post
This code should be added in a particular place of your template

Write your name, or a name from whom the message will be sent to administrator of the site and to user/visitor
Your email or the email from which submissions will be sent to administrator or user/visitor
Write the public key number which you will get if activate captcha
Write the private key number which you will get if activate captcha
Select to keep all submissions in database and show submissions page

Select to send each submission to administrator
Write email address of the administrator
Write subject of the message to administrator
Always Leave {formContent} to get submission form, data and attached files to administrator email

Write a custom text in case sender's message was sent successfully
Write a custom text in case message failed to be send
Write a custom text in case submission was referred to as spam
Write a custom text in case if captcha checkbox is not selected
Write a custom text in case some required field is empty
Write a warning text in case email address is in incorrect form
Write a warning text in case file failed to be uploaded due to some reasons
Write a warning text in case uploaded file was in format, which is not allowed
Write a warning text in case the uploaded file was larger than max allowed size

Enable auto-confirmation message to users
Write auto-confirmation message subject
Write auto-confirmation message content here

These options are available for premium version users, here you can create new themes or make changes on default 5 themes
Start customising your own theme

Change form width within your page
Chose type for form background
Select a color for form background
Write a number to decide border width
Decide a color for the border
Select if you want to see the the of the form
Decide title font size
Decide title font color

Decide if textarea block should have background
Choose a color for textarea box
Write some number to decide border width for textarea box
Write border radius for textarea border
Choose a color for textarea box border
Choose font size for textarea
Decide color of the font in textarea

Configure check box size
Choose whether have circle checkbox or square
Select color for not selected checkbox
Select color for not selected checkbox on hover
Select color for selected checkbox

Configure input-radio size
Choose whether have circle input or square
Select color for not selected input-radio
Select color for not selected input-rado on hover
Select color for selected input-radio

Choose where to posit your custom button
Select to make button full-width
Set up padding for the button
Decide font size for the button text
If button has icon, choose it’s position
Select to add some icon to submit button
Choose one of the icon styles for submit button
Change icon color for submit color
Change icon color for submit color on hover
Choose button text font color
Choose color for submit button text on hover
Select background color for submit button
Select background color for submit button on hover
Write some number to decide border width for submit button
Choose a color for submit button border
Write border radius for submit button border
Reset Button Has Icon.
Choose one of the icon styles for reset button
Choose reset button text font color
Choose color for reset button text on hover
Write some number to decide border width for reset button
Choose a color for reset button border
Write border radius for reset button border
Choose a color for reset button border
Change icon color for reset color on hover

Change label size
Define label font family
Define label font color
Define error label font color
Define * label font color
Define success message label after form has submitted

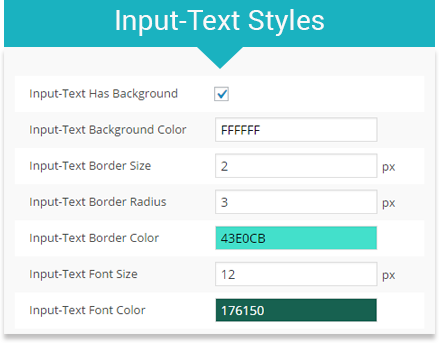
Select whether input-text should have background
Select color for input-text background
Write some number to decide border width for input-textbox
Write border radius for input-text box border
Choose a color for input-text border
Set font size for the input-text
Set up a font color for input-text
Select whether selectbox should have background
Select color for selectbox background
Write some number to decide border width for selectbo
Write border radius for selectbox border
Choose a color for selectbox border
Set font size for the selectbox
Set up a font color for selectbox
Set up a color for selectbox arrow

Select whether selectbox should have background
Select color for filebox background
Write some number to decide border width for filebox
Write border radius for filebox border
Choose a color for filebox border
Set font size for the filebox
Set up a font color for filebox
Write filebox button text
Choose color of the background for filebox button
Choose color of the background for filebox button on hover
Choose font color of the filebox button
Choose font color of the filebox button on hover
Select to add some icon to filebox button
Choose one of the icon styles for filebox button
Choose button’s icon position
Choose a color for button’s icon
Choose a color for button’s icon on hover

Here you will see the list of your forms. Enter in each you will find a list of all submissions

Open the message of the submission
Block IP address, so the user will not be able to send any message from that iP
Delete the submission
The same as standard inbox mail you may select submissions, make bulk of them as read/unread spam/not spam, remove selected at once.
When you click show and open the submission message, you may delete it from inside and if message has some attachment you may download it by one simple click. Plus, search bar will help you quickly find required submission

Here select the form you need (form will be displayed in case it has at least one subscriber)
Choose how many newsletter emails should be sent at once
Choose the interval between each flow
Write newsletter email subject
Write newsletter text here
From this section you may manage the emails for newsletter, delete, add new and follow the progress of sending
