


Installation
-
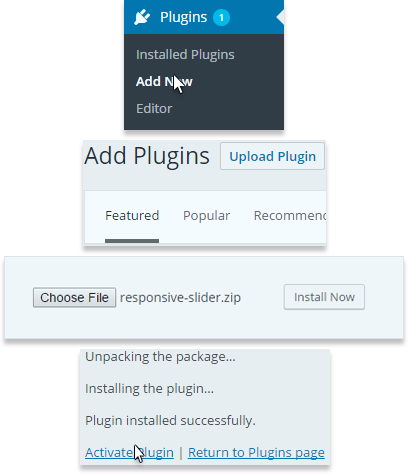
First of all install the plugin from WordPress plugins repository
Choose the social websites, from this list, that you want to display in your post
-
Plugins > Add New > search for the plugin > Install Now
-
After installation > Activate
Using FTP
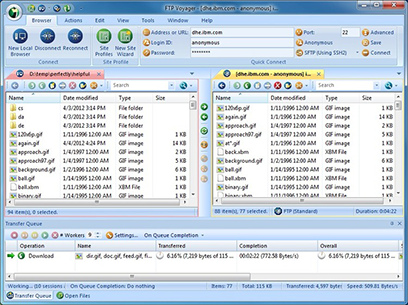
You may also install the plugin via FTP. For this case follow the instruction below.
-
1. Download the ZIP file from WordPress website
-
2. Extract the forms directory to your computer
-
3. Upload the forms directory to the /wp-content/plugins/ directory
-
4. Activate the plugin in the Plugin dashboard
-
5. You can see the plugin installed on WordPress left menu afterwards
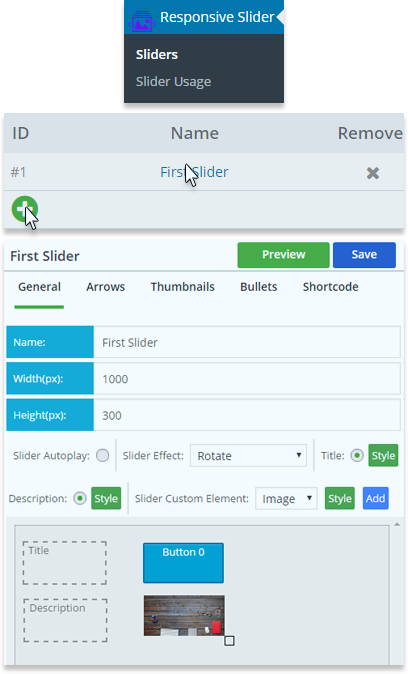
Creation of Sliders
In order to create your first slider press on (+) button to add a new slider. Name your first WordPress slider and add images to it. Follow the instruction below for more details.
General
In General Options make general changes on the slider. These are the following options you may pay your attention to:
-
Name:
Title your slider
-
Width(px):
Configure slider width
-
Height(px):
Configure slider height
-
Slider Autoplay:
This will make the slider to automatically slideshow
-
Slider Effect:
Choose the sliding effect for your slider
-
Title:
Select if you want to have Title on slider, in order to change the style of the title press on "Style"(Styles are for pro version)
-
Description:
Select if you want to have Description on slider, press to "Style" it(Styles are for pro version)
-
Slider Custom Element:
Add custom button, text or image on slider, generally. Drag the corner of the element block to change it's size
Press Preview to watch the result
Press SAVE to finalize your work
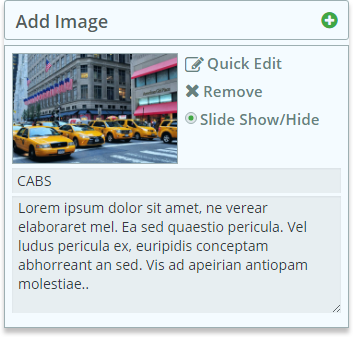
Customization of each image
Click on 'Add Image' choose the image and press on 'Insert'
Click on the image to be able to edit it
Also you may use
-
Quick Edit
-
Remove
-
Show or Hide the image from the slider
Each image contains the following options:
-
Title:
Title your Image
-
Description:
Add description text on every image
-
Slide Element (PRO):
Each image can have custom button, text or image on it
Press Preview to watch the result
Press SAVE to finalize your work
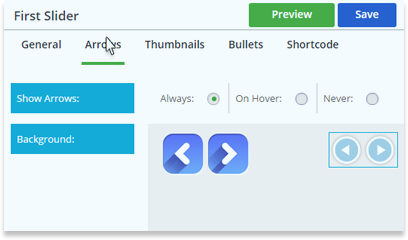
Arrows
Add arrows to the slider slider, in order to click on them and change the slides manually.
-
Show Arrows:
Choose - Always, On Hover, or Never
-
Background:
Choose the style for the arrows
Press Preview to watch the result
Press SAVE to finalize your work
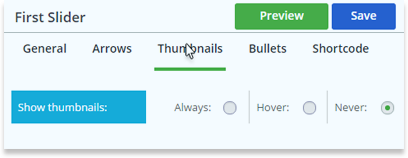
Thumbnails
Thumbnails will allow to showcase image thumbs of your slide, by pressing any thumbnail image you may show it on the slider as default.
-
Show Thumbnails:
Choose - Always, On Hover, Never
Press Preview to watch the result
Press SAVE to finalize your work
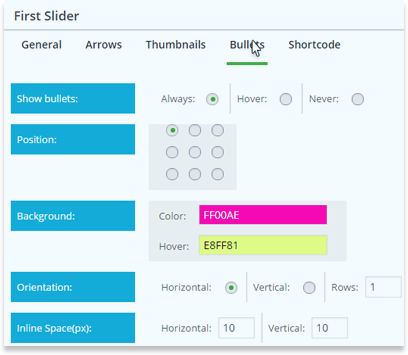
Bullets
Make some custom changes with the bullets/dots on the slider
-
Show Bullets:
Choose to show the dots on slider - Always, on Hover, or Never
-
Position:
Choose one of 9 different positions of the bullets on the image
-
Background:
Select color and on hover color for the bullets
-
Orientation:
Make the bullets Vertically or Horizontally placed on image and rows quantity
-
Inline Space(px):
Set the space between the bullets in pixels
Press Preview to watch the result
Press SAVE to finalize your work
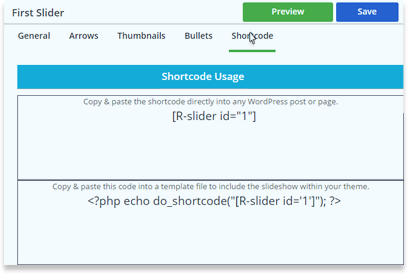
Shortcodes
This section provides with two type of shortcodes
-
First one [R-slider id="n"] for posts and pages, the other one for theme integration
-
Copy & paste the shortcode directly into any WordPress post or page, or template file